TheKiller - 12" tonearm
Having finished the MyTechnics project and gained experiences in rewiring the Rega and Linn tonearms I was triggered to reuse the leftover parts of the Technics SL-5210 tonearm. Of course I aimed
for something special.
A tonearm addicted to greatness and the potential of a giant-killer.
In other words "TheKiller".
12" tonearms are regarded as the battleships within their class, separating the men from the boys.
Their increase length allows for lower distortions if the geometry and setup is done right. The pickups must be mounted with considerable more care to profit from possible
benefits.
Especially sharp-edged needles require exact adjustments, the more so when mounted in a 12"er. But don´t let Yourself become offset by this from trying a 12" tonearm.
conceptual phase and Design
Specifications of TheKiller:
- straight 12" Tonarm using cardanic bearing
- highly stable, yet very lightweight carbon arm tube
- tracking force, set mechanically by the counterweight
- low hanging counterweight for a stable mechanical zero, built in rectangular shape for different horizontal rep. vertical moments of inertia
- Antiskating set via cantilevers, filament and weight
- Headshell with variable Azimuth
- means to vary the height, VTA (vertical tracking angle)
- Tonearm liftaund tonarm rest mounted on a beam
- single audio connector integrated within the arm-shaft
- Geometry based on the SME V-12
- dynamic mass sufficiently low to accomodate for highly compliant MM pickups
Here one can see the basic parts of the Technics tonearm. The completed S-shaped arm tube, mounted in the caradanic bearing assembly, with SME-style Headshell and integral counterweight beam. Missing are the counterweight itself and the Antiskating mechanism.


The S-shaped arm tube can´t be reused for the longer arm. Also the SME-Headshell is not reusable due to its 23° Offset angle. A straight or J-shaped arm is required.
One can see in pics 2 and 3 that the original bearing cross is manufactured from a plastic material. The counterweight beam is secured to the cross with a damping rubber damper and a single central screw. The torque of the screw varies the amount of damping of the rubber damper.
Therefore one could assume that every arm showed slightly different amounts of damping and a slightly different sonic character.
The Offset angle of the bearing cross of the Technics tonearm is around 23°. A 12"er requires a lower Offset angle value around 17°. A aluminum cylinder fits into a bore of the bearing cross. Small sized ball bearings are press fitted into both ends of that cylinder.
The two pivot needles that are located in the sides of the gimbal bearing ring can be adjusted very precisely, such that the vertical bearing runs extremly smooth but without slack. Counternuts fixate and secure the settings. Similar bearing assemblies are located at the top and bottom of the gimbal ring. The associated pivot needles are located in the outer C-shaped gimbal ring.
This setup results in a first class, finest tuneable and highly stable bearing assembly, that I like to reuse. Technics specifies a static friction value of mere 7mg for this kind of bearing employing steel balls. Even lower 5mg are specified for the ruby balls employed in their EPA-100 tonearm.
In comparison the larger diameter ball races used by Rega and Linn are specified at 20mg at best.
Status up to that time: Besides the gimbal bearing assembly with its aluminmum bearing holder and the tonearm rest probabely no other subassembly can be reused.
Design
Here come just a few pics of the SME V-12, whiches geometric layout and the design of the counterweight I intend to copy. Pics of the Linn Akito as well, of which the Headshell and mounting base with its height setting mechanism will be role models.


On the pics of the SME V-12 one recognizes that the arm tube, the bearing-cross and the slotted counterweight beam are manufactured (cast) as one piece. The counterweight features a notch for precise guidance, that fits the shape of the counterweight beam. The counterweight is fixated from the topside by a single, easy accessable screw.
Both arms, the SME as well as the Linn feature a projecting beam that holds the arm lift and the arm rest.
To reduce the mass the aluminum headshell of the Linn is perforated. A triangular shaped piece of the sidewall increases the stiffness in vertical direction. The headshell is glued fix to the arm tube.
A disadvantage is the small size of the headshell, so that longer and wider pickups can´t be mounted and adjusted properly.
CAD
The Projekt beame only possible with due help of a friendly colleague, who not only made the CAD sketches but also manufactured the most of the new parts. Here one can see the almost final stage of the development.


As one can easily see the attributes of the role models.
- The bearing cross and the counterweight beam form a single joint subassembly.
- The Armtube is a independent device.
- The Headshell is sufficiently large and long for any pickup cartridge.
- The tonearm rest and tonearm lift are mounted on a separate beam.
- The height is set by a moveable shaft that is fixed by a screw in a base plate.
- A audio connector, probabely a Mini-XLR 5-pol, is integrate into the base plate
- The Antiskating is set via two beams and a weight on a thread.
Manufacturing phase
It´s quite astonishing how much help and support the Audio forums, contacts from those, and one´s own circle of friends and aquaintances can offer.
Be it ideas and moral support, or help in sourcing materials and manufacturing of parts.
The Armtube
Due to the point 11 of the specifications -low dynamic mass- the Armtube could only be made from a lightweight material. At the same the requirement of highest stiffness only left over the choice for Carbon. A bit of brainstorming resulted in Carbon-tubes, shafts of arrows, fishing rods and nordic-walking-stick as possible candidates.
Now, fishing rods need to be flexible, walking-sticks are rather too large in diameter for the Technics cardanic bearing and arrow shafts are usually too small in diameter.
A good colleague of my HiFi regular´s table supplied me with shafts for special hunting arrows though. They feature a oversized diameter of 9.8mm and a low arm wand thickness. The shaft is very stiff, yet very lightweighted. It fits well to the Technics cardan, because the original Technics Armtube is 9.5mm in outer diameter. Tapping the tube prooved a good inherent damping character. The original Technics-S pings long lasting like a chime, which obviously affects the sonic character of the whole arm.
Foamy ear plugs will serve as additional damping measurement. Those are quite lightweighted, but offer good damping qualities when they are positioned inside the tube under slight press-fit conditions.
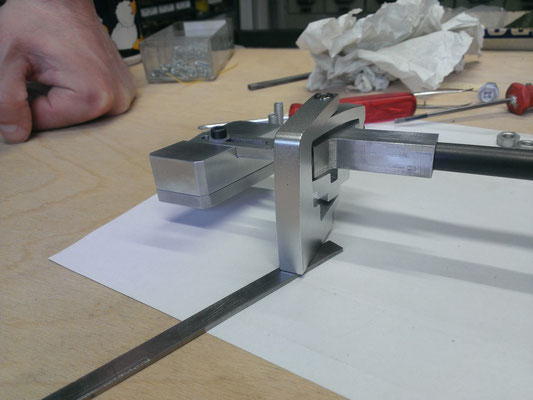
The bearing cross
Beeing a mix-up between the Technics bearing cross and SME´s counterweight beam, both Forms needed only to be united. The Offset angle measures 17.5°.
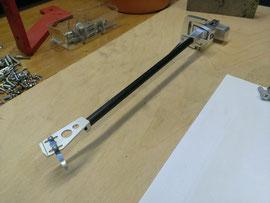
Here You can see the raw form, without the tapering of the counterweight beam.


The Headshell
The Headshell is designed in similarity to the Linn Akito Headshell.
It features a clamping mechanism, so that the vertical tracking angle (VTA or Azimuth can be set. Not all pickup cartridge needles are mounted eactly vertical. As a small gimmick, a fine line is routed parallel to the front edge. A lead of a pencil can as such be used to level out the Headshell horizontally. One can also easily see the vertical stiffener.
To easily determine the correct distance from the pivot to the platter centre, a small hole was drilled into the Headshell. The pin of a sleeve that is pushed on the platter centre pin fits exactly into that hole.


The counterweight
The counterweight is made up from two parts.
The main weight, into which a notch is routed, so that the counterweight beam can guide the weight precisely, and a threaded hole to fix the weight with a screw. Two cylindrical pieces of lead are pressed into bores from the bottom side to raise the mass of the weight and to introduce some damping. Also from the bottom surface two threaded holes are accessible, that allow to screw-on a additional weight. The add-on weight is also lead-filled. This way one can tune the mass of the Arm with different add-on weights to accomodate for lightweight to heavy pickups.
The rectangular shape of the weight leads to a lower vertical inertia than the horizontal inertia. This helps the arm in tracking warped records easier. Warps in records manifest acoustically as wow&flutter, clearly measureable with a warped test record, even if the platter rotated the record perfectly constant and smooth.


the tonearm-lift

A Rega-Lift serves as tonearm lift here.
Sourced as replacement part it doesn´t cost too much and it´s neat chromed cap nut allows for simple fixing through a fitting bore and a spacer sleeve.
the lift-beam
The task of the beam is to serve as a combining element for the height-variable shaft and the bearing cardan, as well as to hold the armlift and armrest.
Formally the function defines the shape. This unites straight and rounded lines.


The tonearm basis
The tonearm basis consists of two subassemblies, the mounting base with integrated audio connector and the height-variable shaft.
Whilst manufacturing the parts, an idea for a VTA-varying mechnism, the Vertical Tracking Angle, occured. The pickup´s stylus is required to plunge into the groove with the same vertical alignment as the cutting stylus. Therefore the arm shaft is allowed to slide in a bore of the mounting base, locked by a set screw. A fourth beam with a threadedhole is added to the Lift-beam. A knurled-head screw is screwed through the lift-beam in a way that it protrudes through the beam and rests against the mounting plate. The height shall be variable in height by plusminus 5mm.
A 5-pole panel connector after IEC 60130-9, a Lumberg SFV, is mounted to the lower end of the arm shaft. It is fixed in the shaft bore with a set screw through the side wall, because its own thread can´t be used here. The connector, which is similar to the DIN-type, features a male thread where the corresponding socket can join. For this system of connectors straight as well as angled sockets are available. The angled socket type Lumberg WKV was chosen.


provisional mounting

Mounted here with a provisional counterweight.
The counterweight beam already has gotten its tapered shape.
With Headshell just a few days later.
Shortly on with the regular counterweight.


After finishing the lift-beam the appearance of the provisional mount hints how the arm will look like in the end. The original arm-rest is reused, just shortened slightly in height.
The small difference in the diameters of the 0.3mm thinner Technics-tube against the new Carbon-tube is negligible.


Home stretch


Now almost all parts are manufactured and require only a decent surface finish and the final mountage. The tonearm cabling still needs to be made. In the second pic one can see four small dents at the bore of the shaft and a small threaded hole coming from the side. These are to mount and fix the connector in 4 possible directions.
In pic no.4 one recognizes the threaded hole in the mounting plate. The screw that is inserted here, fixates the height of the arm shaft and prevents the shaft from turning out of position.
In pic no.7 one can see the new fourth beam of the Lift-beam, which has been added to hold a height-varying screw.
The last few yards
This project startet about the mid of 2014. Initially tought of as a clearly simpler Tonearm with fewer functions and a decent surface finish.
Due to the immeasurable worthy help of my ´little Helper´ who did all the mechanical manufacturing of the new parts, the TheKiller matured from a DIY-bricolage to a Tonearm to be taken seriously and capable to meet professional demands.
Now yesterday , April 11th. 2015, I received a late easter egg. But take a look on Your own:


The surface is shot peened in silver matte. That matches the also matte Arm-Tube and the matte-grey color of the Slate plinth of the turntable. The pictures don´t really fit the impression of the Arm in reality. Its even more beautiful and impressive.
All configurational details satisfy the requirements in perfect and precise fashion.
As I wished for is the assembly of the arm not only easy and precisely adjustable, but also very smooth running.
One of the design goals was to keep the dynamic mass of the arm so low, that even high-compliance MM-cartridges may be fitted. This needs to be finally verified, but I got the impression that it will be doable.
The cabling
The cabling as a tweak for Tonearms is the topic of many threads in respective forums. Much nonsense takes place and even more nonsense is spread. Cable tweaking is rumored to grant close to magical capabilities. The more so if manufactured as single-piece and manufactured from exotic or precious materials. Single-piece in this case means, that the thin wires, originally intended only for internal use within he Arm, don´t terminate at a connector at the Arm and the signal is further handled by decent coax cables, but they are elongated right to the input of the Phono-preamplifier. Each single connector contact point is regarded as evil and everything less than monocrystalline, multi-cryogenized pure silver wire is regarded crap. The protagonist nonchalantly ignore thereby the rather flimsy headshell screw contacts as well as the additional headshell connector cables, the shielding problem outside of the Arm and losses from the comparably high copper resistance of the thin wires.
I view the cabling theme with a more practical eye. There are numerous points with more important ´hand wheels´ for sound than the cabling.
I use as thin and flexible silk-spun copper-litz wire (in sensible compromise with the wire resistance) internally in the arm, utilising fixed soldered cartridge connectors and a decent connector. External to the arm I use good quality coax-cables leading to the Phono-preamplifier.
HF-Litz wire has proven to be useable as strands, e.g. silk-spun 7x0.05mm, of which I twist two together for a single strand. The plus- and minus strands of each stereo channel are then twisted together also. Done this way the strands are low enough in ohmic resistance and mechanically very flexible. The twisting does increase the capacitance of the strands, but the resulting 50-60pf present no issue. In my opinion the advantages outweigh the small disadvantage that the twisting generates. Both stereo channels are clean separately positioned in the armtube to avoid interchannel crosstalk.
The bottom of the arm shaft holds a connector that is a variant of the DIN-connector. A locking nut and sensibly designed contacts guarantee for a safe and sane connection.
As cable between arm and phono-preamplifier either a a well screened low-capacitance coax cable, or a balanced microphone cable is used.
Since the strands within the arm are unshielded, some means of shielding must be supplied for. By using metallic parts and a carbon arm tube a electrical connection exists from the headshell down to the arm shaft. The connection though passes the ball bearings and due to this it is not reliable. Therefore a threaded bore is drilled into the bottom side of the bearing cross, between the gimbal and the counterweight.
A eye is screwed on, to which a piece of stranded litz wire is soldered, that terminates in the PE-contact of the DIN-connector. This way a good shielding and reliable PE-connection is achieved.
minor modifications
The carbon arm tube is already inherently well dampened in comparison to the typical metallic tubes. Hit with a metallic probe pin one can hear a short high-pitched ´Tick´. Due to its low mass it requires only very low-mass damping measurements. Foam ear-plugs have proven very practical. Compressed to smaller dimensions one can position the foam anywhere in the arm tube. When the released foam expands it exhibits a slight pressure on the inner tube wand. This applies considerable damping to the tube. I cut three small discs of app. 3mm thickness from the ear-plug and positined them at the beginning, the middle and the end of the arm tube. Even though the mass increased by mere 1g the damping effect is clearly audible. Hit with the metallic probe pin again only a short thud ´Togg´ can be heard. At the same the plugs fixate neatly the position of the cable strands.
At the time I´m thinking about another, optional modification, a fluid damping mechanism that shall dampen the horizontal and even more so the vertical resonance. These resonances occur due to the compliance of the cartridge´s cantilever and the inertia of the arm. The damper rubber, located at the cantilever´s fulcrum solely takes over the task to dampen the resonance. Additional damping may thus be positive. The fluidous damping is achieved by a small paddel which is fixed to the arm tube and that dips into a trough filled with a viscious fluid.
Fast movements of the arm, e.g. the vibrating with the resonance frequency (optimum at ~10Hz) will be reduced, while slow movements for example from a excentric vinyl record (~0.5Hz) can still be followed easily.
HighEnd 2015 in Munic, Mai 14. - 17.
The tonearm was taken to the HighEnd show, where I could show it to a couple of acquaintances.
Joachim Gerhard took no denial to personally thread the Antiskating-weight. Jonathan Carr of Lyra and others immediately started a shoptalk. On sunday, the last day of the show the arm went into the hands of Holger Barske (LP magazine) who will put it to the acid test over the next couple of weeks. I´ll report back when he has given his judgement.
Update Juli, 08.2015:
The tonearm had been in H.Barske´s hands for seven weeks and is now returned to me. H.Barske apparently had been very busy lately and didn´t find time for a evaluation. I´d like to thank H.Barske
that he was in principle willing to invest some of his time to evaluate my personal bricolage. Unfortunately though that You and I have to wait longer for a qualified third-party opinion about
the TheKiller.